


Lizard Skin 350-TIC Thermal Insulating Coating
Choose your option

Lizard Skin 300-SDC Sound Deadening Coating
Choose your option


3M™ Thinsulate™ Van Insulation Kit for 2007+ Mercedes Sprinter
Choose your option


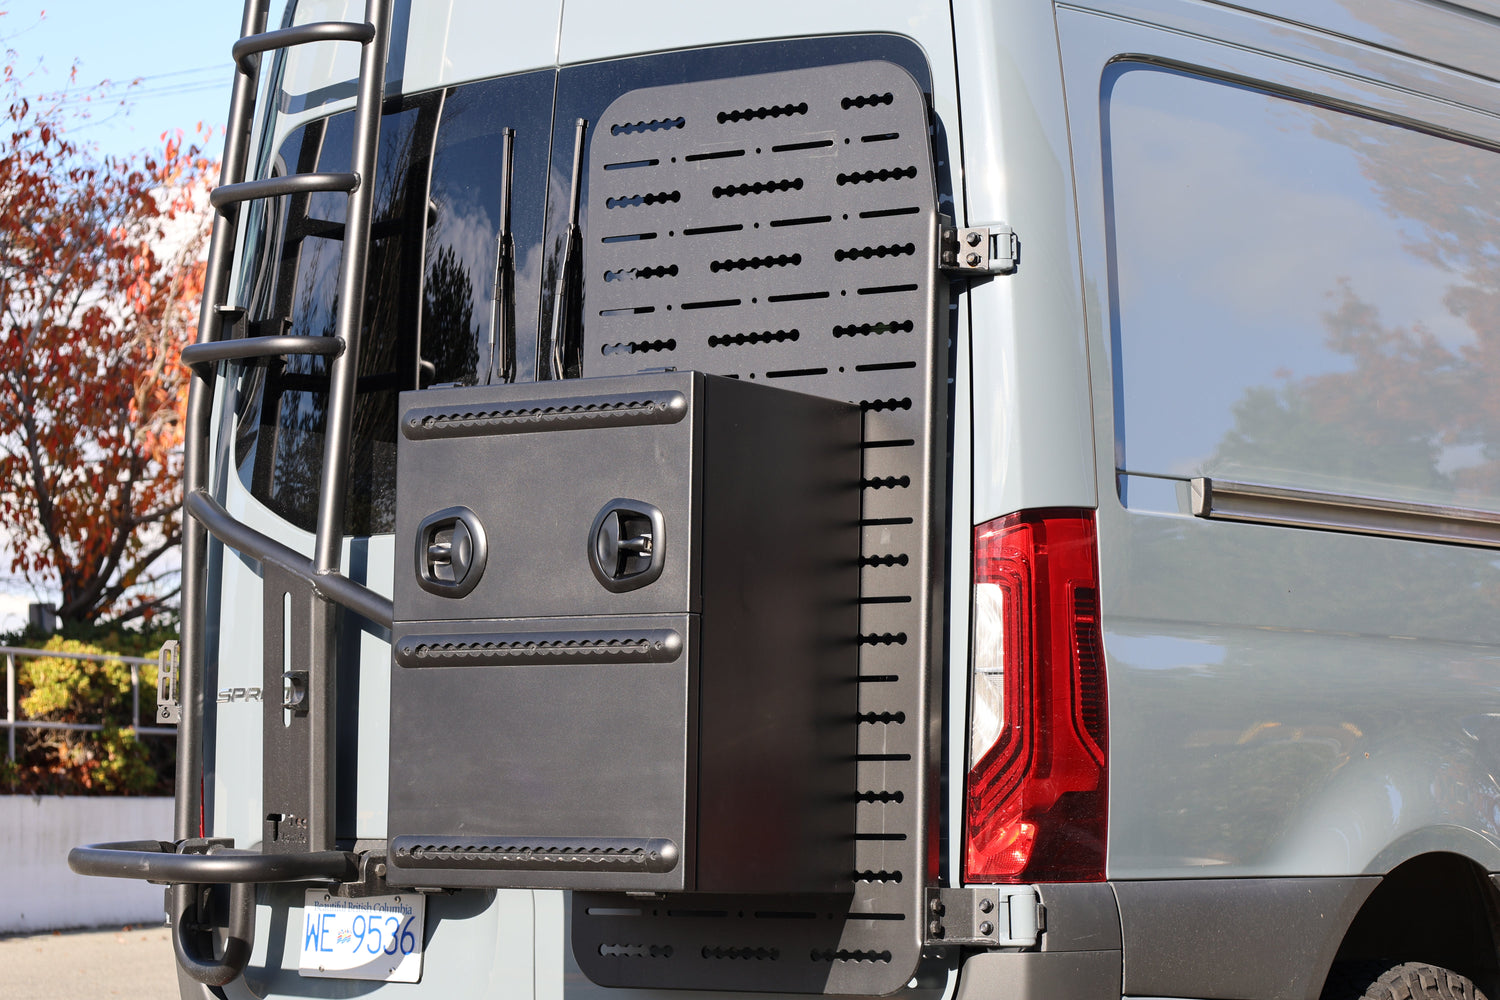
Lost Hiway Toilet Box
Choose your option


Lost Hiway Mercedes Sprinter Overhead Cabinet
Choose your option


Lost Hiway Ford Transit Overhead Cabinet
Choose your option


Lost Hiway Low Fender Box Set
Choose your option


Lost Hiway Utility Bench
Choose your option


Lost Hway F.A.S.T. Cabinet - 28"
Choose your option


Lost Hiway F.A.S.T. Bench
Choose your option


Lost Hiway Sprinter/Transit Slim Overhead Cabinet
Choose your option


EcoFlow 5kWh Power Kits
Choose your option


EcoFlow 10kWh Power Kits
Choose your option


New EcoFlow Power Kits | 5 kwh
Choose your option


New EcoFlow Power Kits | 10 kwh
Choose your option

EcoFlow 5 kwh Battery
Choose your option


EcoFlow 15kWh Power Kits
Choose your option


New EcoFlow Power Kits | 15 kwh
Choose your option
NO-DRILL EXTERIOR GEAR


Choose your option


Choose your option

FEATURED PRODUCT VIDEO


MobiFrame Single Swivel Seat - 2019+ Mercedes Sprinter(907) - Driver Side
Choose your option


MobiFrame Single Swivel Seat - 2019+ Mercedes Sprinter(907) - Passenger Side
Choose your option


MobiFrame Single Swivel Seat - 2014+ RAM ProMaster - Driver Side
Choose your option


MobiFrame Single Swivel Seat - 2014+ RAM ProMaster - Passenger Side
Choose your option


MobiFrame Single Swivel Seat - 2015+ Ford Transit - Driver Side
Choose your option


MobiFrame Single Swivel Seat - 2015+ Ford Transit - Passenger Side
Choose your option

MobiFrame Single Swivel Seat - 2007-2018 Mercedes Sprinter(906) - Driver Side
Choose your option

MobiFrame Single Swivel Seat - 2007-2018 Mercedes Sprinter(906) - Passenger Side
Choose your option
VAN LAND BLOG

5 Reasons Your Espar Heater isn't Working
If your Espar heater won’t start, shuts off randomly, or is blowing cold air, there’s a good chance it’s one of these five issues. Most failures aren’t catastrophic — they’re system protection responses. Here are the Top 5 most common reasons your Espar heater isn’t working, starting with the most common. #5 Low Battery Voltage Espar heaters require a high amperage surge during startup (up to ~30 amps briefly). If your battery voltage drops too low during ignition, the heater will automatically shut down. Symptoms: Heater shuts off right after turning on Unit starts, then dies mid-cycle Smell of unburnt diesel Common causes: Cold weather Weak battery bank Undersized wiring Voltage drop during glow plug ignition #4 Fuel Delivery Problems Diesel heaters are extremely sensitive to fuel supply. Even small disruptions can prevent ignition. Common issues: Air bubbles in fuel line Incorrect fuel pump angle Melted or poorly routed fuel lines Auxiliary fuel tap not reaching fuel level If your heater sputters, smokes, or fails to ignite fully — check fuel first. #3 Intake or Exhaust Restrictions Your heater needs proper airflow in and out. Any blockage, kink, or moisture buildup can cause overheating or flame-out errors. Watch for: Debris in intake Kinked exhaust line Condensation trapped in low exhaust loops Tight routing under chassis Even small obstructions can shut the unit down. #2 Heater Lockout from Failed Starts After too many failed ignition attempts, Espar heaters enter safety lockout mode. Even if you fix the original problem, the heater may still appear “dead” until the fault code is cleared. This is one of the most misunderstood issues — and one of the easiest to fix once you know how. #1 Carbon Buildup from Short Run Times This is the biggest long-term killer of diesel heaters. Running the heater on low constantly, short cycling, or improper shutdowns leads to carbon buildup in the combustion chamber. Over time this causes: Hard starts White smoke Flame-out errors Complete ignition failure Diesel heaters are designed to run hot. Occasional high-output runs keep the system clean. Watch the Full Video for the Complete Breakdown In the full video, we walk through: How to properly test voltage during startup What correct fuel pump angle and routing should look like Real-world examples of airflow mistakes How to access the hidden Espar diagnostic menu How to prevent carbon buildup long-term Want Step-by-Step Repairs? Join Van Land Club Van Land Club Members get: ✔ Detailed repair walkthrough videos✔ Real van build troubleshooting examples✔ How to clear lockouts and fault codes✔ Preventative maintenance guidance✔ 5% off every Van Land purchase If you own an Espar heater, this content alone can save you hundreds in service calls. 👉 Join Van Land Club to learn how to fix each issue.

MobiFrame Seat Swivels Prioritize Safety
When you’re camping in your van, every square inch matters. With Mobiframe Sprinter Seat Swivels, your front seats help you maximize your living space, rotating seamlessly into your living area. Whether you’re eating breakfast at the table, relaxing with friends, or winding down after a long hike, swivels make the cab part of your home. Why MobiFrame Seat Swivels? In our latest Van Land video, Jeremy reviews his install and experience using driver and passenger MobiFrame Sprinter Seat Swivels, detailing why they’re the safest and most reliable choice for van conversions. Watch Now Key Advantages MobiFrame swivels transform your van's front seats into functional living space with a low-profile design (adding just 1.25" of height), a front-facing release lever that’s easy to access, and an off-center swivel mechanism that helps clear the B-pillar. Making Mobiframe seat swivel more convenient with less seat adjustment than other brands. What really sets MobiFrame apart is their dedicated engineering process, rigorous product testing, and unmatched stability. Two essentials are a must have for your vehicle seat upgrades—safety and comfort—and MobiFrame delivers both at the highest level. Rigorously Tested: Certified Safety Standards – Tested to FMVSS 207/210 and related CMVSS standards (2017 revision), exceeding requirements for seat strength and anchorage. Accredited Testing – Verified by accredited institutions including TÜV, IDIADA, DEKRA, and PIMOT on U.S.-spec chassis. Multi-Market Validation – Tested across multiple chassis, makes, and models for each target market, not just a single vehicle. Ejection Mitigation Design – Engineered with seatbelt geometry, passenger positioning, and rollover scenarios in mind to ensure compliance with ejection mitigation requirements. Manufacturing Excellence – Built with high-grade steel, precision rotation points, and reinforced load-bearing structures. Trusted not only in camper vans but also in: Ambulances Police vehicles Military applications NATO service vehicles (including HIMARS missile support systems) Available now for Sprinter, Transit, and ProMaster vans. Get the Full MobiFrame Sprinter Seat Swivel Installation Video Van Land customers get exclusive access to Van Land's MobiFrame Installation and other installation walkthrough videos sent directly to you, including the #1 mistake to avoid when installing seat swivels. Van Land Club Members Get More! Join Van Land Club to get instant access to MobiFrame and other top-product installations before you buy. Plus, Van Land Club members enjoy free access to one-on-one consultations anytime and get 5% off every order! Shop Mobiframe

LizardSkin Heat and Sound Deadening Insulation: Build Series Ep. #9
In Episode 9 of the Build Series, LizardSkin's product manager, Cody Watson joins Jeremy and team to demonstrate the installation of LizardSkin heat and sound insulation coatings. Advanced LizardSkin coating upgrades both comfort and performance in a camper van, with thermal insulation and sound deadening coatings that go far beyond traditional van insulation. Key Points: LizardSkin 350-TIC Thermal Insulating Coating — A spray-on, water-based thermal barrier that withstands up to 350°F, reduces condensation, and helps your AC cool the interior about 45% faster than standard insulation. Class A fire-rated and designed for lasting performance. LizardSkin 300-SDC Sound Deadening Coating — A water-based, low-VOC coating that reduces vibration, mechanical noise, and road sound. It bonds to surfaces like wheel wells and walls while also preventing rust and corrosion. In this episode, Jeremy shares a major milestone in his van build: completing the first stage of insulation using LizardSkin coatings. While Jeremy has been in the van industry for years, he admits he was new to this product. That changed when he stepped into a demo van on a blazing hot day. Parked in full sun, the demo van had LizardSkin applied to its walls — and the difference was dramatic. Instead of the interior feeling hotter than outside (a typical van problem), it actually felt cooler. Even surfaces exposed to direct sunlight weren’t hot to the touch. That moment convinced Jeremy to integrate LizardSkin into his own all-weather build. Why LizardSkin? To show how it works, Jeremy invited Cody Watson from LizardSkin Coatings to the shop. Cody explained the two water-based acrylic products used in this build: LizardSkin 300-SDC Sound Deadening Coating — Damps vibration, reduces road and mechanical noise, and prevents rust and corrosion. LizardSkin 350-TIC Thermal Insulating Coating — Uses ceramic microspheres to block conduction, convection, and radiant heat transfer, keeping interior surfaces cooler in direct sun. Both products spray on easily, clean up with water, and cure quickly. Cody recommends two 20-mil coats of sound deadening followed by two coats of thermal insulation after a 24-hour cure period. Installation Details Jeremy’s van received a full treatment: Sound coating: Floor, walls, ceiling, and rear doors. Thermal insulation: Everywhere the sun hits (walls, ceiling, doors), layered directly over the sound coat. Time & Cost Breakdown: 2x 5 gallon LizardSkin OEM sound control ($840) 2x 5 gallon LizardSkin OEM thermal insulation ($870) Spray kit ($195) and extra cup ($30) Total: ~$1,935 + shipping Labor time: 2 days (6–8 hours active work) The process requires careful prep — masking off surfaces, scuffing the metal, wiping with isopropyl alcohol — but once spraying begins, the coatings apply evenly and bond seamlessly to irregular van panels. Real-World Heat Test To measure performance, Jeremy parked his van in 90° weather with one untreated door and one LizardSkin-treated wall in direct sunlight. Using a heat gun, he recorded: Untreated surface: ~122°F Treated surface: ~100–103°F That’s nearly a 20° difference. Beyond the numbers, Jeremy noted the treated panels never became uncomfortably hot to touch, unlike untreated surfaces, which quickly grew too hot to rest a hand on. Who Benefits Most from LizardSkin? Van lifers seeking maximum insulation and sound control. Anyone traveling in hot or humid climates where AC struggles. Pet owners, needing passive protection from interior overheating. Builders with limited wall space who need a thin, efficient insulation alternative. Key Takeaways Complete protection: Offers complete system for spray-on sound deadening and thermal insulation. Proven performance: Cuts surface temps by nearly 20°F in heat tests. Efficient installation: Spray-on, water-based coatings are easy to apply and clean up. Slim profile: Provides high performance without bulky layers. Worth the investment: Around $1,935 for materials and two days of work. Ready for the full installation? Van Land customers receive a full installation video with every LizardSkin purchase, and Van Land Club members get free access to exclusive walkthroughs and behind-the-scenes content. Shop Now Lizard Skin Sound Control Lizard Skin Thermal Heat Shield


